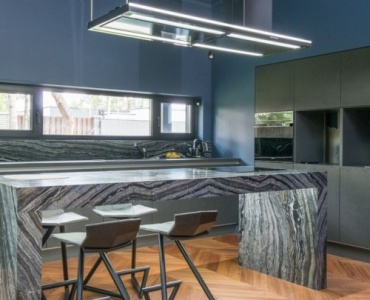
Quartz-composite countertops offer the rare blend of beauty, resilience, and day-to-day practicality that modern kitchens demand. If you’re planning a remodel or refreshing key surfaces, this comprehensive guide shows you how to orchestrate the entire space around your choice of engineered quartz—turning a simple slab into the showstopping anchor of a kitchen that works as good as it looks.
Why Quartz-Composite Is the Ultimate Everyday Worktop
Quartz-composite (often called engineered quartz) is crafted from natural quartz particles bound with high-performance resins and pigments, forming a dense, consistent slab. The result is a non-porous, low-maintenance surface that’s designed for busy households and serious cooks alike. It holds up to spills, scrapes, and regular cleaning without demanding the sealing and special care that many natural stones require.
What Exactly Is Quartz-Composite?
At its core, quartz-composite is typically 90–95% ground quartz with 5–10% resin and color additives. The manufacturing process compresses and cures this mixture into highly stable slabs, enabling consistent colorways and patterns (from subtle and monochrome to bold marbling). That consistency gives you design confidence—and makes it easier to match seams or expand with future pieces down the line.
Performance Profile: The Everyday Wins
- Non-porous and stain resistant: Coffee, wine, turmeric, and oil are less likely to penetrate when wiped promptly.
- Scratch and chip resistance: Harder than many natural stones, quartz-composite shrugs off daily knife nicks and cookware bumps. (Still use a cutting board for blade safety.)
- Hygienic surface: Because it’s non-porous, it’s easier to keep clean—a practical foundation for food prep areas.
- Heat caution: It’s heat tolerant for brief contact, but use trivets for hot pans to protect the resin binders and finish.
- Color and pattern control: What you select in the showroom is what you’ll see at home—no surprises vs. variable natural slabs.
When Quartz Isn’t Perfect
Engineered surfaces are strong, but not invincible. Direct, sustained heat can risk discoloration or micro-damage. UV exposure can affect some resins over time, so full-sun outdoor kitchens aren’t ideal unless the brand specifically rates the material for exterior use. These aren’t deal-breakers—they’re simply planning cues for smarter design choices.
Start With the Slab: Color, Pattern, and Finish
Your countertop is the visual and functional anchor of the room. Begin there, then orchestrate cabinetry, flooring, and lighting around it to strike a balance between statement and simplicity.
Colorways and Pattern Personalities
- Solid and near-solid tones: Minimalist and modern, excellent with textured cabinetry and bold hardware.
- Soft marbling: Evokes stone elegance without fussy maintenance; great for timeless kitchens.
- Concrete looks: Matte, industrial vibes that pair well with warm woods and black fixtures.
- Terrazzo-inspired: Speckled depth for playful or mid-century schemes; hides crumbs and smudges well.
- High-drama veining: An instant focal point; keep surrounding materials quieter to prevent visual overload.
Tip: Collect large-format samples or visit full slabs to evaluate scale. Small chips can’t convey veining movement, particle density, or undertones in real light.
Finish: Polished, Honed, Suede, or Leathered
- Polished: Reflective, brightens darker rooms; shows fingerprints and smudges more readily.
- Honed (matte): Subdued, stone-like look with less glare; may show oils more on darker colors.
- Suede/velvet: Soft-touch matte with a tactile feel; balances sheen and maintenance.
- Textured/leathered: Adds grip and dimension; best for industrial or rustic styles.
Thickness, Edge Profiles, and Waterfall Drama
Standard thicknesses are 2 cm and 3 cm. Thicker profiles read premium and sturdy; thinner, with a mitered build-up, create modern lines and allow dramatic waterfall returns on islands.
- Edge options: Eased, square, bevel, bullnose, ogee, or mitered waterfall. Square or eased edges suit modern cabinets; ogee and bullnose soften traditional spaces.
- Seam strategy: Confirm maximum slab sizes with your fabricator. Place seams away from primary sightlines or busy prep zones.
- Overhang planning: Cantilevers beyond 10–12 inches (25–30 cm) typically require hidden steel supports.
Match or Contrast With Cabinetry?
Consider undertones. Warm-veined tops love creams, natural oak, or brass. Cool-grays and charcoals pair with white, black-stained ash, or brushed nickel. Two foolproof strategies:
- High contrast: White marbled quartz with matte black cabinetry for a tailored, gallery-like feel.
- Tonal layering: Soft-grey top with pale-oak cabinets and warm lighting for organic calm.
Plan the Layout Around the Countertops
The right layout lets your quartz-composite surface shine—visually and functionally. Think workflow, sightlines, and where your slab deserves center stage.
Work Triangle vs. Work Zones
The classic triangle (sink, cooktop, fridge) still works, but zone-based layouts excel in open plans. Group tools and surfaces by task:
- Prep zone: Largest uninterrupted stretch of counter, near the sink and knives.
- Cooking zone: Landing space on both sides of the range or cooktop.
- Cleanup zone: Sink, dishwasher, and trash pull-out in a tight cluster.
- Baking/coffee zone: Secondary counter for specialized tasks; consider a quieter pattern to minimize visual clutter.
Designing the Island as a Centerpiece
An island wrapped in quartz delivers functional square footage and sculptural presence. When planning:
- Minimum aisle widths: Aim for 42–48 inches (107–122 cm) around the island for smooth flow.
- Seating comfort: Target a 12-inch (30 cm) overhang and 24 inches (61 cm) of width per stool.
- Waterfall edges: Use miters to continue veining down the sides; confirm vein alignment on the template before cutting.
- Outlet placement: Integrate pop-ups or discrete side outlets to preserve slab purity.
Backsplash Integration
- Slab backsplash: Continue the same quartz up the wall (4 inches to full height) for a clean, luxe line.
- Tile pairing: If your countertop is patterned, use simple subway or zellige; if the top is quiet, consider statement tile.
- Window ledges: Cap sills in matching quartz for continuity and easy wiping.
Smart Storage and Surface Integrations
A hard-working kitchen tucks everything within reach while preserving pristine surfaces. Pair quartz with storage solutions that streamline your routine.
Landing Zones and Task Sequencing
Plan landing pads of 15–24 inches (38–61 cm) on both sides of major appliances. Keep chopping boards, oil pull-outs, and trash within two steps of your prep run. The more intuitive your sequence, the cleaner your counters will stay.
Integrated Accessories That Elevate Function
- Drain grooves and recessed drainboards: Machined into the slab near the sink for sleek, dish-drying utility.
- Flush-set cooktops: A near-seamless look; confirm manufacturer tolerances for heat clearance.
- In-counter appliance lifts: Hide mixers below; keep the countertop clutter-free without sacrificing access.
- Pop-up outlets and wireless chargers: Power where you need it, only when you need it.
Sinks, Faucets, and Edges
- Undermount sinks: Best pairing with quartz; wipe crumbs straight in, no lip to catch grime.
- Integrated quartz sinks: Seam-minimized and visually quiet; confirm slope and finish for easy rinsing.
- Faucet finishes: Tie to hardware for cohesion—brushed brass warms marbled whites; matte black sharpens concrete-look tops.
- Edge radiusing: Slightly eased edges curb chipping and are friendlier to hips and aprons.
Lighting That Loves Your Quartz
Great lighting makes engineered stone glow without glare. Layer light sources and tune color temperature to flatter your finish.
Layered Lighting Strategy
- Ambient: Recessed cans or low-glare linear fixtures set the field.
- Task: Under-cabinet LEDs deliver shadow-free prep light across counters.
- Accent: Pendants over islands and toe-kick LEDs create depth and drama.
Color Temperature and Finish
2700–3000K flatters warm-veined or cream tops; 3000–3500K complements cool-grays and crisp whites. If your surface is polished, choose diffused fixtures to reduce hot spots and reflection.
Under-Cabinet Essentials
- Continuous diffusers: Prevent scalloping shadows on the slab.
- Front-edge placement: Mount near the cabinet face to light the full depth of the countertop.
- Dimming: Evening-friendly brightness keeps the space inviting.
Style Pairings: Hardware, Backsplash, Flooring, and Palette
With the countertop chosen, refine the supporting cast to build a cohesive look.
Metal Mixology
- One dominant, one accent: Anchor with brushed nickel or black; accent with brass or copper in small doses.
- Match or complement: Coordinate faucet, pulls, and lighting canopies for rhythm without monotony.
Backsplash and Grout Choices
- Color-matched grout: Calms busy tile against patterned quartz.
- Contrasting grout: Adds graphic punch behind quieter tops.
- Full-height slab: Minimalistic and wipe-clean; highlight veining continuity.
Flooring Underfoot
- Warm woods: Balance cool, modern quartz with natural texture.
- Large-format porcelain: Durable and seamless, ideal for urban, contemporary schemes.
- Stone-look LVT: Budget-friendly resilience with family-proof performance.
Upper Cabinets vs. Open Shelving
If the countertop is patterned, open shelves can relieve visual weight and show off curated pieces. For maximal storage, run uppers to the ceiling and keep the counter uncluttered to celebrate the slab’s surface.
Installation and Detailing: From Template to Polish
Meticulous planning and professional fabrication turn a beautiful material into a flawless centerpiece.
Templating and Tolerances
- Cabinets must be level and secured before templating.
- Confirm reveals around undermount sinks and cooktops; standard is 1/8–1/4 inch (3–6 mm) depending on style.
- Mock up seam placement with painter’s tape so you can visualize from key sightlines.
Seams, Cutouts, and Reinforcement
- Seam adhesives: Color-matched epoxies reduce visibility, especially on veined designs.
- Cutout support: Reinforce around sinks, dishwashers, and appliance openings to prevent stress cracks.
- Overhang steel: Hidden brackets or flat bars preserve clean lines while carrying load.
Heat and Venting Clearances
Respect manufacturer guidelines around ranges and wall ovens. Install proper ventilation to manage steam and reduce condensation that can mark cooler, honed finishes.
DIY vs. Pro
Quartz-composite is heavy and precise. Professional fabrication ensures clean miters, exact sink reveals, and safe handling—crucial for a premium result.
Care, Maintenance, and Longevity
One of the best reasons to build a kitchen around engineered quartz is how easy it is to live with. A few smart habits keep it looking new for years.
Daily Care
- Wipe spills promptly with a soft cloth and mild soap or a pH-neutral cleaner.
- Use cutting boards to protect knives and preserve the finish.
- Employ trivets or pads under hot pots, air fryers, and slow cookers.
Tough Marks and What to Avoid
- For stuck-on residues: Soften with warm water; use a plastic scraper if needed.
- Avoid harsh chemicals: No paint strippers, oven cleaners, or highly alkaline/acidic agents.
- No abrasive pads: Skip steel wool; if necessary, use non-scratch sponges per the brand’s care guide.
Refresh and Minor Repair
Micro-scratches on matte finishes can sometimes be blended professionally. Stains are uncommon on non-porous slabs; check your brand’s stain-removal recommendations for specific substances.
Budgeting and Value
A strategic budget puts your money where impact and durability matter most.
Cost Snapshot
- Material and fabrication: Varies by brand, thickness, finish, and edge detail.
- Templating and install: Typically included in professional bids; ask for a line-item breakdown.
- Extras: Waterfall miters, integrated drainboards, special cutouts, and hidden steel supports add cost but elevate function and finish.
Where to Splurge vs. Save
- Splurge: On the island slab and edge detailing—it’s the star.
- Save: Perimeter counters in simpler patterns or thinner thickness with built-up edges.
- Smart compromise: Use a statement quartz on high-visibility runs and a budget-friendly surface in a back pantry.
Sustainability and Indoor Air Quality
More manufacturers are focusing on responsible sourcing and lower-emission resins.
What to Look For
- Low-VOC certifications: Third-party testing for indoor air quality peace of mind.
- Responsible manufacturing: Recycled content options and water-recycling during production.
- Longevity: Durable materials that reduce the need for frequent replacement are inherently more sustainable.
Common Mistakes to Avoid
- Overmatching patterns: Busy counters plus busy backsplash equals visual noise. Let one element lead.
- Ignoring lighting glare: Polished finishes under harsh downlights show every reflection; diffuse and dim.
- Skimping on support: Long overhangs need steel; don’t rely on wishful thinking.
- Bad seam placement: Avoid dead-center island seams if you can change dimensions or orientation.
- Undersized prep zones: Protect uninterrupted runs; appliances can shift, but a great prep stretch is sacred.
Step-by-Step Planning Checklist
Use this roadmap to keep your project on track from inspiration to installation.
- Define your style and color palette with a mood board.
- Shortlist 2–3 quartz-composite slabs; view full slabs under different lighting.
- Choose finish, thickness, and edge profile; decide on waterfall returns early.
- Lock cabinet layouts to protect uninterrupted prep surfaces.
- Map zones (prep, cook, clean, coffee/bake) and assign storage near each.
- Confirm appliance specs and required clearances for cutouts and ventilation.
- Plan lighting layers and switch/dimmer locations to flatter your countertop finish.
- Settle backsplash strategy (slab vs. tile) and grout color.
- Coordinate metals: faucet, pulls, hinges, and lighting finishes.
- Request detailed fabrication drawings; review seam placement and vein matching.
- Verify support for any overhangs; specify brackets or steel flat bars.
- Schedule templating after cabinets are installed, leveled, and secured.
- Do a final on-site walk-through with the installer before cutting begins.
- Prepare the home for install day: clear paths, protect floors, confirm utility access.
- Complete punch list and photograph seams and edges for your records.
If you’re wondering How to design a kitchen with a quartz‑composite countertop from the ground up, this checklist is your step-by-step path to align materials, layout, lighting, and detailing for a cohesive, high-performance result.
Three Style Recipes to Try
1) Scandinavian Calm
- Countertop: Soft white with faint gray marbling, honed finish.
- Cabinetry: Light oak flat-panel with integrated pulls.
- Backsplash: Vertical white bead tile with matching grout.
- Hardware + Faucet: Brushed nickel for a cool, quiet sheen.
- Flooring: Pale engineered wood planks.
- Lighting: Diffused pendants, 3000K under-cabinet LED strips.
2) Modern Farmhouse
- Countertop: Warm white with bold, naturalistic veining; polished.
- Cabinetry: Shaker fronts—perimeter in soft gray, island in deep navy.
- Backsplash: Handmade zellige in cream, tonal grout.
- Hardware + Faucet: Aged brass cup pulls, bridge faucet.
- Flooring: Medium-tone oak with character.
- Lighting: Lantern pendants over a waterfall island.
3) Urban Minimal
- Countertop: Concrete-look quartz in suede finish.
- Cabinetry: Matte black slab doors with discrete channel pulls.
- Backsplash: Full-height matching slab for seamless planes.
- Hardware + Faucet: Black or gunmetal to disappear.
- Flooring: Large-format porcelain in warm gray.
- Lighting: Linear LED over island; toe-kick glow for depth.
FAQs
Is quartz-composite more durable than natural stone?
It’s exceptionally durable and non-porous, resisting stains without sealing. Many natural stones are porous and need periodic maintenance. Both are strong; engineered quartz offers more consistency and easier care.
Can I put hot pans directly on the countertop?
Brief contact is usually fine, but it’s best to use trivets or heat pads to protect the resin binders and finish.
Will it scratch?
It’s highly scratch resistant but not scratch proof. Use cutting boards to protect both the surface and your knives.
How do seams look on veined designs?
Good fabricators color-match epoxy and book-match veining where possible. Review seam locations and vein flow on the template before cutting.
What finish is easiest to maintain?
Polished is the most forgiving for routine cleanup, though it can show fingerprints. Honed and suede finishes minimize glare but may reveal oils more on dark colors.
Is it safe for food prep?
The non-porous surface makes routine cleaning straightforward. Always follow the manufacturer’s care guidance and standard kitchen hygiene practices.
Can I use quartz outside?
Most engineered quartz isn’t rated for prolonged UV exposure. If you need an outdoor kitchen, look for products specifically designed for exterior use.
How long does installation take?
After cabinets are installed and templated, fabrication typically takes 1–3 weeks, with on-site install in a day for most kitchens.
Bringing It All Together
Designing a kitchen around quartz-composite countertops means you’re free to chase beauty without babying your surfaces. Start with a slab that tells your story—its color, veining, and finish—then choreograph lighting, storage, and layout so everyday cooking feels seamless. Sweat the details: edge profiles, seam placement, overhang supports, and under-cabinet lighting. Protect your investment with simple care, and you’ll enjoy a space that’s as resilient as it is refined.
Whether you’re refreshing a galley or building a chef’s haven, the path is the same: choose the right material, plan the zones, specify the details, and partner with pros who respect the craft. Follow these principles and you won’t just own a striking surface—you’ll command a kitchen that works hard, entertains beautifully, and stands the test of time.
If you’ve been searching for practical, stylish guidance on How to design a kitchen with a quartz‑composite countertop, use this framework as your blueprint—then make it yours with finishes and flourishes that feel like home.