Turning kitchen waste into fertile compost doesn’t have to take months. With the right blend of science, technique, and a few clever shortcuts, you can convert banana peels, coffee grounds, and veggie trimmings into nutrient-rich humus in a fraction of the usual time. This guide shows you how to make compost quickly from kitchen scraps using proven methods that fit a backyard, a balcony, or even a small kitchen.
Why Fast Composting Is Worth Your Effort
Speedy composting isn’t just about beating the clock. It multiplies benefits that matter to gardeners and eco-conscious households:
- Quicker soil improvement: Faster cycles mean you can amend beds sooner and more often, boosting plant vigor and yields.
- Less waste sent to landfill: Diverting organic scraps cuts methane emissions and garbage volume.
- Fresher nutrients: Rapid processing retains more plant-available nitrogen and beneficial microbes.
- Odor and pest control: When properly managed, speedy systems minimize smells and reduce fruit flies and rodents.
- Year-round productivity: Short composting cycles keep your garden supplied across seasons.
The Science Behind Speed: What Makes Compost Go Fast
Composting is a biological engine powered by microbes. To accelerate it, you must optimize the four fundamentals: carbon-to-nitrogen balance, particle size, oxygen, and moisture. Add temperature to the mix and you’ve got the turbo button.
Carbon and Nitrogen (C:N) Ratio
Microbes thrive around a 25:1 to 30:1 C:N ratio. Kitchen scraps (greens) are nitrogen-rich; browns like shredded paper and dry leaves provide carbon.
- Greens (N): fruit and veggie scraps, coffee grounds, tea leaves, fresh grass clippings.
- Browns (C): shredded cardboard, paper towels, dry leaves, straw, sawdust (untreated).
Fast-track tip: If your pile stalls, add greens (or dilute urine, alfalfa pellets) to push heat; if it smells or looks slimy, add more browns.
Particle Size and Surface Area
Chop, shred, or blend scraps. Smaller pieces mean more surface area, allowing microbes to work faster. Aim for pieces no larger than a fingernail. A quick pulse in a blender or food processor with a splash of water produces a slurry that heats up rapidly.
Oxygen and Aeration
Compost microbes need air. Aerate by turning the pile, using a tumbler, or inserting perforated pipes. Lack of oxygen invites anaerobic conditions and odors. More air equals faster breakdown.
Moisture
Target 50–60% moisture—as damp as a wrung-out sponge. Too dry and the process stalls; too wet and it turns smelly. Adjust with dry browns for excess wetness, or add water to dusty mixes.
Heat (Thermophilic Phase)
When you balance carbon, nitrogen, moisture, and oxygen, your pile should quickly reach 130–160°F (55–70°C). This thermophilic range speeds decomposition and reduces pathogens and weed seeds. Keep it hot by turning to re-oxygenate and maintaining the right moisture.
What You Can and Can’t Compost Fast
Not all kitchen waste is equal when speed is the goal.
- Best for fast compost: vegetable and fruit peels, soft produce scraps, coffee grounds and filters, tea bags (plastic-free), crushed eggshells, stale bread in small amounts, rice/pasta (sparingly, mixed deeply), spent flowers.
- Use cautiously or avoid in quick methods: meat, fish, dairy, oily foods, large bones, glossy/coated paper, diseased plants, weeds with mature seeds. These can attract pests or slow the process. Meat/dairy can be handled in Bokashi first, then added to a hot pile.
Gear That Speeds Everything Up
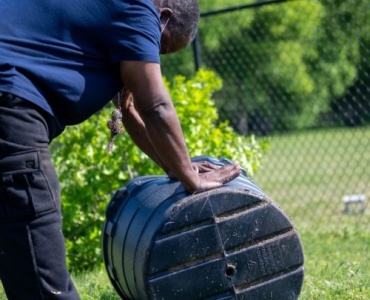
- Compost tumbler: Sealed drum you rotate; excellent aeration and pest control; heats quickly with the right mix.
- Bokashi bucket: Airtight fermenter with a drain; pre-processes kitchen waste in 10–14 days before finishing in soil or a pile.
- Sturdy bin or 3x3x3 ft pile space: The classic volume for thermophilic action.
- Shredder or blender: For chopping browns and pulsing scraps into microbe-sized bites.
- Compost thermometer: Optional but powerful feedback tool to guide turning schedules.
Fast-Track Methods You Can Choose From
Pick the approach that best fits your space and schedule. You can also combine methods for maximum speed.
1) The Hot Pile (Berkeley-Style 18-Day Compost)
This is the gold standard for speed outdoors. With the right mix, you can get finished compost in about 2–3 weeks.
- Size: At least 3x3x3 ft (1 m³). Smaller volumes lose heat too quickly.
- Recipe: Roughly 2–3 parts browns to 1 part greens by volume. Mix thoroughly; avoid thick layers.
- Turning schedule: Turn on days 4, 6, 8, 10, 12, 14, 16, 18 (or every 2 days once heating begins). Keep moisture at wrung-sponge level.
- Finish: Once the pile stops reheating and looks dark, crumbly, and earthy, cure for 1–2 weeks.
2) Compost Tumblers
A tumbler simplifies aeration: load, spin, heat, repeat. With well-shredded inputs and weekly rotations, you can get mature compost in 4–6 weeks; partial compost ready for mulching can arrive in 2–3 weeks.
- Keep a separate collection bucket to stockpile greens and browns, then batch load the tumbler for proper C:N.
- Spin 3–5 full turns every 1–2 days at peak heat; adjust moisture if clumps form.
3) Bokashi Pre-Composting
Bokashi uses beneficial microbes to ferment all kinds of scraps (yes, even meat and dairy) anaerobically in 10–14 days. The fermented material isn’t finished compost, but it breaks down extremely fast when buried in soil or added to a hot pile/tumbler.
- Sprinkle Bokashi bran over each layer of scraps, press out air, and keep sealed.
- Drain leachate and dilute for non-edible plant feeding per manufacturer guidance; avoid foliar use on edibles.
- After fermentation, bury 8–12 inches deep or mix into an active hot pile for rapid assimilation.
4) Vermicomposting (With Speed Boosts)
Worm bins thrive at room temperature and produce castings quickly. While worms prefer steady feeding over large hot batches, you can speed results by pre-chopping and lightly pre-composting scraps for a few days to soften them. Expect ready castings in 4–8 weeks depending on bin size and feeding.
- Use bedding like shredded cardboard, coir, and leaves; keep moist but not soggy.
- Feed small amounts regularly; avoid overloading. Bury food to deter fruit flies.
5) Trench or Pit Composting
Dig a trench 8–12 inches deep, add chopped scraps, cover with soil and browns, and let the soil microbes work. Not technically fast compost in a bin, but fast-to-use nutrients where plants will grow. Great for low-effort gardeners.
Step-by-Step: A 21-Day Plan to Turn Kitchen Scraps into Compost
This plan combines hot composting principles with practical household routines so you can master how to make compost quickly from kitchen scraps with minimal fuss.
Day 0–2: Prep and Stockpile
- Collect 1–2 large buckets of chopped kitchen scraps (no meat/dairy unless using Bokashi first).
- Shred a matching volume of browns: dry leaves, paper, cardboard.
- Optional accelerators: a few shovels of finished compost or active garden soil, alfalfa pellets, or fresh grass clippings.
Day 3: Build the Pile (or Load the Tumbler)
- Mix greens and browns thoroughly at roughly 1:2–1:3 by volume. Aim for a baseball-mitt feel when squeezed (moist but not dripping).
- Build to at least 3x3x3 ft, or fill the tumbler 60–75% so it can tumble freely.
- Insert a compost thermometer if available. Expect temperature to rise within 24–48 hours.
Day 4–6: First Turn and Heat Surge
- Turn the pile once it passes 130°F (55°C) or after 48 hours. Flip outer materials into the center.
- Adjust moisture as needed. If it’s dry, mist while turning; if soggy, add shredded cardboard.
Day 7–14: Maintain the Momentum
- Turn every 2 days. Keep temperatures between 130–150°F (55–65°C). Reaching 160°F (70°C) briefly is okay, but sustained temperatures that high can slow microbes—turn to cool slightly.
- If heat lags, add a nitrogen boost: coffee grounds or a small amount of alfalfa pellets, thoroughly mixed.
Day 15–18: Final Turns
- Material should look darker and more uniform. Fewer identifiable scraps.
- If using a tumbler, reduce spins to every other day as heating tapers.
Day 19–21: Cure Briefly
- Stop turning and let the compost rest for 3–7 days to stabilize.
- When it smells earthy, crumbles easily, and is near ambient temperature, it’s ready for use or can cure longer for extra stability.
Recipe Templates for Fast Results
Use these simple, repeatable recipes whenever you’re focusing on how to make compost quickly from kitchen scraps.
Rapid Kitchen Mix (for Hot Piles or Tumblers)
- 1 bucket finely chopped veggie/fruit scraps
- 2 buckets shredded browns (cardboard + leaves blend)
- 2–4 cups coffee grounds (mix in, don’t layer thickly)
- 1 shovelful finished compost or garden soil (microbial inoculant)
- Water as needed to reach wrung-sponge moisture
Apartment Mini-Batch (for a Countertop Tumbler or Balcony Bin)
- Blitz scraps in a blender with a little water until chunky
- Combine with twice the volume of shredded paper/cardboard
- Add a handful of coco coir or dry leaves for structure
- Stir well; add a scoop of old compost to inoculate
Additives and Boosters: Do They Help?
Some amendments can speed early stages or improve the end product’s quality.
- Finished compost or active soil: Inoculates with microbes. Highly recommended.
- Alfalfa pellets/meal: Nitrogen-rich and contains triacontanol, a natural growth stimulant—great for kickstarting heat.
- Coffee grounds: Nitrogen-rich and fine-textured, but use moderately and mix well.
- Rock dust: Adds minerals; doesn’t speed decomposition but enhances nutrient balance.
- Biochar (pre-charged): Improves aeration and microbial habitat; charge first with compost tea or nutrient solution before adding.
- Commercial accelerators: Useful but optional if you already have balanced inputs and inoculants.
Moisture, Air, and Heat: Your Speed Control Panel
Dial these in and you’ll master how to make compost quickly from kitchen scraps regardless of method.
- Moisture test: Squeeze a handful; it should clump with only a drop or two expressed. Add water or browns to correct.
- Aeration rhythm: In hot piles, turn every 48 hours at peak. In tumblers, spin every 1–2 days, then taper.
- Temperature checks: If it hasn’t heated in 72 hours, it’s often too dry, too airy (excess browns), or too small. Adjust accordingly.
Odor, Fruit Flies, and Pests: Fast Fixes
Quick compost can be clean and neighbor-friendly with the right practices.
- Odor problem? Usually too wet or too many greens. Mix in dry browns, turn, and re-check moisture.
- Fruit flies? Always cap fresh additions with 2–3 inches of browns or bury them deep. For worm bins, freeze and thaw scraps first, then bury.
- Rodents? Use a sealed tumbler or a bin with hardware cloth bottom and tight lid. Avoid meat/dairy unless using Bokashi first.
Small-Space and Indoor Options
Don’t have a yard? You can still learn how to make compost quickly from kitchen scraps in tight quarters.
- Bokashi + Planter Finish: Ferment scraps in a Bokashi bucket, then bury fermented material in a deep planter or balcony box. Plant after 2–4 weeks.
- Stackable worm bin: Keep under a sink or in a closet; harvest castings from lower trays every few weeks.
- Compact tumbler: Balcony-friendly models work well with blended scraps and shredded paper, but keep rain out to avoid sogginess.
Seasonal Tactics
- Winter: Insulate piles with straw bales or old blankets; feed with hot water bottles during deep freezes; stockpile browns indoors to keep moisture right.
- Summer: Shade your bin and watch moisture; hot, dry air can halt microbial action.
- Rainy periods: Cover piles to prevent waterlogging; add dry browns if things get soggy.
Common Fast-Composting Mistakes (and Quick Corrections)
- Overloading greens: Foul smell and matting. Fix: add shredded browns and turn thoroughly.
- Too much paper/cardboard: Pile won’t heat. Fix: add nitrogen (grounds, alfalfa), moisten, and mix.
- Big chunks: Slow breakdown. Fix: chop or blend; re-mix for better contact.
- Neglecting turns: Heat stalls. Fix: resume a steady turning schedule.
- Small pile volume: Won’t sustain heat. Fix: batch materials until you can build at least 3x3x3 ft, or use a tumbler.
How to Know When It’s Done (and Safe for Plants)
Fast doesn’t mean rushing immature compost onto beds. Use these simple tests before applying.
- Look: Mostly uniform, dark brown, crumbly; original materials largely unrecognizable (eggshell flecks are fine).
- Smell: Clean, earthy aroma—not sour or ammonia-like.
- Touch and temp: Near ambient temperature and no wet, slimy clumps.
- Bag test (optional): Seal a moist sample in a plastic bag for 3 days. If it smells foul when opened, cure longer.
Using Your Quick Compost
- Soil amendment: Work 1–2 inches into top 6 inches of garden beds before planting.
- Mulch: Spread 0.5–1 inch around perennials and veggies, keeping off stems to prevent rot.
- Potting mix boost: Blend up to 25% screened compost with high-quality potting soil.
- Compost extract: Soak a mesh bag of finished compost in a bucket of water for a few hours, stir, and drench soil. Use immediately; avoid brewing aerated teas without proper sanitation.
Advanced Tips to Shave Off More Time
- Layer like a lasagna—but then mix: Build alternating layers for easy measuring, then thoroughly blend for uniform decomposition.
- Pre-heat with a starter core: Start a small hot core with fresh grass and alfalfa; add your chopped kitchen mix around it.
- Perforated aeration tubes: Place a vertical PVC or wire tube in the pile center to promote airflow between turns.
- Parallel bins: Run two systems—one active, one curing—so you always have product ready.
Frequently Asked Questions
Can citrus, onion, and garlic go in fast compost?
Yes, in moderation and chopped small. They’re fine in a hot pile or tumbler. Vermicompost bins tolerate them better when mixed thoroughly and not overdone.
Is coffee ground overuse a problem?
It can be. Coffee is nitrogen-rich and very fine; too much can create dense mats. Mix with coarse browns and limit grounds to under 20% of total volume.
How do I keep flies out of my rapid system?
Bury fresh scraps 6–8 inches deep and cap with browns. Keep bins closed, and avoid over-wet, exposed food layers. Freezing scraps before use helps.
Do I need a thermometer?
No, but it’s helpful. Without one, use the hand test: if you can’t comfortably hold your hand in the pile center for long, it’s hot and active.
Can I speed up a worm bin as much as a hot pile?
Not to the same degree, but you can accelerate castings by chopping food fine, avoiding overloads, maintaining 60–80°F (15–27°C), and harvesting regularly.
Putting It All Together: A Simple Framework
To master how to make compost quickly from kitchen scraps, remember this framework:
- Chop and balance: Small pieces; greens-to-browns around 1:2–1:3.
- Moisten: Wring-out-sponge feel.
- Aerate: Turn or tumble on a rhythm.
- Heat and repeat: Monitor temperature, correct inputs, and keep mixing.
- Cure: Let it rest briefly for stable, plant-safe compost.
Quick-Start Checklist
- Collect and chop a batch of kitchen scraps.
- Shred 2–3x volume in browns.
- Mix to a uniform texture and right moisture.
- Build a 3x3x3 ft pile or load a tumbler 60–75% full.
- Turn on a schedule; adjust moisture and inputs as needed.
- Finish and cure; test for smell, look, and temperature.
Conclusion: From Peels to Black Gold—Fast
Whether you opt for the classic hot pile, a tidy tumbler, Bokashi pre-composting, or a compact worm bin, speed is simply a matter of dialing in balance, particle size, moisture, and airflow. With these principles, it’s easy to demonstrate how to make compost quickly from kitchen scraps in any household. Start small, iterate, and you’ll soon turn yesterday’s peels into tomorrow’s thriving soil—quickly, cleanly, and consistently.
Secondary Strategies and Terms to Explore
For readers aiming to deepen their understanding and broaden SEO-friendly language, consider these closely related concepts and techniques:
- Fast composting methods, rapid compost cycle, and quick kitchen waste composting
- Thermophilic composting, 18-day compost method, and high-temperature decomposition
- Greens and browns ratio, balanced C:N, and nitrogen/carbon management
- Compost booster, microbial inoculant, effective microorganisms (EM)
- Shredding, particle size reduction, and structural aeration
- Trench composting, in-situ composting, balcony composting
- Fruit fly prevention, odor control, and pest-proof bins
Use these terms naturally as you practice and share your experiences. The more you work with these ideas, the faster and better your compost will become—no matter your space or season.
Now you have the essentials and the playbook. It’s time to put scraps to work.